"The more you know, the less you carry" - Mors Kochanski.
Showing posts with label Do It Myself. Show all posts

November 19, 2008

Bushcraft Bucksaw Belt

During the last garage clean up, I found some belting hardware that I had been saving, hidden amongst the piles of bushcraft do-it-yourself gear.

I decided that I needed to put together the bucksaw belt and possibles pouch for cruising around the property.

What is the Bucksaw belt you ask? OK. You might not be asking but lets pretend you did!

The belt is created with 2 layers of material sewn/glued together in order to store a bucksaw blade inside. I got the idea from some of Mors Kochanski's teachings. Since I made a bushcraft bucksaw during my course with Mors and Jack Mountain Bushcraft School on an earlier post, I thought it would be a good idea to put the belt together too!

So here goes:

I had some nylon belting that fit perfectly with the plastic belt buckle. I would have liked to use leather for this project but I wanted to try it out to see if I liked it first. The leather will come later in time. So I folded the belting in half and measured it to myself making sure that I could adjust the buckle depending on the clothing I was wearing. No point in making it if I can't use it as a belt for my pants or over all my winter clothing too! Once I had it set I threw it down on the sewing maching and stitched the edges together leaving an opening at one end.


Taking a 24" saw blade I connected some cord and a couple key rings to one end. The cord is just to pull the blade out of the belt but the key rings are to hold the ends of the sawblade on the bucksaw when it is made.


I took some scrap cardboard to make it easier to slide the saw into the belt.
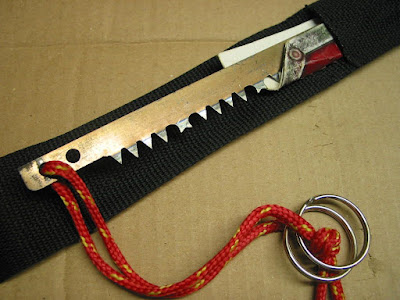
Put the entire thing together and here is what you have:

I had expected the blade to stick out and bother me, even with so flexible of material. Turns out once it was on I did not notice it at all. I have been wearing it for the last couple of weeks and although I would like to make it with more traditional materials and make it look nicer, it works, and that is the main thing. Right?

Should be posting my possibles pouch and belt setup in a day or so.

Thanks, Decado.

November 11, 2007

Hand Made Bucksaw

I have always wanted to try making my own Bucksaw. I have read articles on them and seen one that someone else made but it's not the same as making your own.

This is the one I built at the Bushcraft and Wilderness Survival course with Mors Kochanski at Jack Mountain Bushcraft school. It was one of the projects that the students worked on.

It may not look like much but it works like a dream! After borrowing a friends folding saw on one of my last trips, I really got excited about the idea of taking a saw along. It makes short work of those larger pieces of dead-fall that you can use for your fire or shelter.

This is the one I made.... OK.... Mors helped a bit.


The next thing I am going to work on for this is setting up a leather belt so I can just lay the blade inside it and wear it whenever I am out. Mors mentioned this but I think I read it somewhere else before that.

Thanks for reading,

November 10, 2007

Another spoon...

While I was at the Bushcraft and Wilderness Survival Course with Mors Kochanski, I had the opportunity to spend a little time carving during one of the sessions.
And I thought to my self.... Self! Why don't you carve yourself another spoon! So that's what I did.

This is what it looked like when I got it home. Note that it was very green wood when I started carving. Green is far easier to carve that dry wood and made it a lot faster to carve. Under the circumstances I did not take the necessary precautions and wrap it in a plastic bag to let it dry slowly. As you can see there is a crack at the tip of the spoon and a larger one at the start of the handle.
I decided to finish it anyway and see if I could salvage it. I pulled out the sand paper and went to work.
Here is what it looked like after an hour or so of sanding.
The small crack is mostly gone but the larger crack is still there. It was a lot deeper than I thought it would be, but it looks better. Will probably give this to someone for a present.
I also wanted to try oiling this to see how it would turn out. Here it is drying.

Spoon #2 completed. #3 is already started.

Thanks for reading,


October 29, 2007

Wood Stoves and Jerky and Puppies. Oh my!

You know. Since I started doing this whole blog thing about my passion that is Bushcraft, I have developed a theory.

The theory is such: The moment you decide to be a blogger you begin to feel an obligation to post relevant information to all those blog readers out there about that which is the theme of your blog (if you have one). Once you take that step, the path is clear, the horizon is infinity and your joy is boundless! And then the "Hundred little gods" in the world throw every possible distraction they can find at you. From household needs to new additions, to work related drudge, to the ever popular "Dad! Will you play cars with me PLEEEEEEAAAAASSSSEEEEE!"


*Sigh*

Don't you people know I have a blog to write!?! And not just any blog but a Bushcraft Blog!?!
This is why you will always find at least a couple of posts in the history of a blog's life where you can read the words "Sorry", and "Haven't posted in a while" and my personal favorite, "Been a bit busy lately..." Oh well. Life is like that isn't it?

Ok. Onwards and upwards as they say:

Guess who just got a puppy! Yeah. I know. Like I don't have enough on my plate with a full time job, 2 part time contracts, 2 kids, a wife (a beautiful one at that!), a morgage and the bushcraft affliction as Pablo stated... But think of the future faithful companion and cool hiking buddy! Right Mungo? Sorry. Not a Beagle but an Australian Sheppard. Wonder if my wife is trying to tell me she wants someone a bit smarter around the house she can work with... (or actually see once in a while) Pictures of the cute toe-biter to come.

Got my stove (basically) finished friday nite. Will be posting pictures and an explaination when I get back from the Mors Kochanski Course next weekend at Jack Mountain Bushcraft in New Hampshire. I had started looking at my kit last week. You know.... when it was nice a warm and sunny out? And the evenings were cool and comfortable? Yeah. Suggestion: Don't pack for a camp in November when its still nice out in October! Part of the brain kept thinking it was going to be nice and warm out.... HA! After waking up Sunday to see roofs and cars covered in frost! Time to re-think my kit and find the long underwear! I wanted to post my bushcraft kit list here but... review above theory. Will have to do that when I get back from the course. Actually might be good to post the list with comments on what I actually needed and used! You know what they say about "hindsight"?

One other thing I managed to get done this weekend was.. BEEF JERKY! Man I love my beef jerky. I have never really like the packaged stuff. Mostly because I find them over seasoned and you never really know if the flavor is because the meat is starting to go bad (which was commonly done in the medeval times) or that they don't want anyone to find out where the meat actually came from! Since I prefer to "DIY" it, and making it myself makes it alot cheaper, I decided to make up a batch of what I call "Cooking Jerky". It's lightly seasoned with garlic, lemon juice, soya sauce and garlic. (No. that is not a typo) I will be putting a post up with pictures and a couple of idea/trick that I use soon.


Well, I better get back to that "Life" thing.

Thanks for reading,


October 25, 2007

Working on the stove...


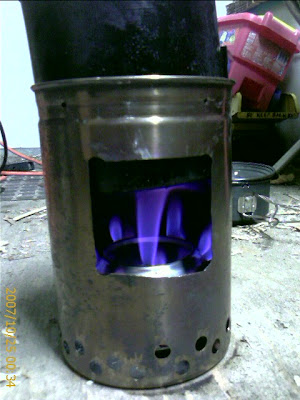
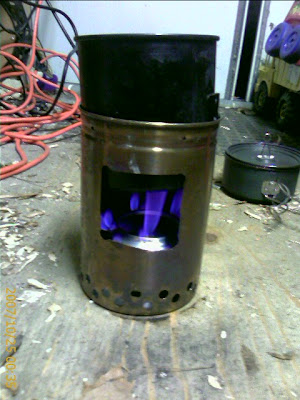
So I have been working on one of my components to my bushcraft kit. The stove. I have based the design on Ravenlore's Mulit-purpose cooking kit. The basis of the stove is that it can be used with multiple types of fuel. The main fuel of course is wood, since it is all around and this type of stove uses a lot less wood than a campfire. In some places where fires are banned, this type can still be used. But I wanted to work and test it out with other fuels as well since each has its own pros and cons. So other than wood, I was working on Meth-Alcohol, solid fuel, and an idea my brother gave me: charcol. (not a lot ... just a couple as a backup situation. 2 or 3 should work but will have to test)

I will have more information for everyone including pictures of the whole kit and such later. Last nights work was on creating a new alcohol stove that I could keep in my cook set. Everyone has probably heard of the pop can stove, (and I have been using them for a couple of years now) but I wanted to try something bigger that worked well when I left the stove at the bottom of the stove pot, instead of mounting it halfway up the can. Simplicity is the name of the game here people!

I tried using beer cans to start, but I found that the amount of space on the inside of the can will drastically change the efficiency of the stove. After playing around with a couple of different cans and hole punching scenarios, I ended up using 2 of those "ginseng drink" cans.

One thing that I think I learned was that the less holes punched for the gas to come out and burn, the harder it is to keep the thing lit. The more holes you punch the hotter it is but the faster you use up the fuel. It's all in finding the balance, my friend.

So after playing around in the shed (when I should have been sleeping) I think I got one that works. I will be testing it out down in New Hampshire when I make it down for the training course with Mors Kochanski in a week! *insert embarrassing dance of joy here*


Here is a couple of pictures of the stove with the alcohol stove lit.


Once I have completed the stove/cooking kit I will get some pictures up of it so you can see how it turned out.

Thanks for reading,

October 23, 2007

How to make a small container...

Ever wanted a small container that won't get crushed and is basically water-proof? (ok well... water-resistant depending on what you do with it...)

I found this somewhere on the internet when I was doing a lot of searching for Survival stuff but it works for whatever you need. I am not claiming that it is an original idea of mine but I have definately run with it!


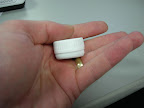
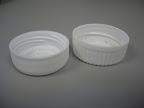
Get yourself 2 different bottle lids. You can save them from the recycle bin from pop bottles, milk bottles, water bottles, etc. You need to make sure that one is slightly bigger than the other. I think the bigger one in the picture below is from a cream container and the other from a water bottle.


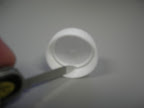
Using a sharp knife, cut off the thread on the larger cap about halfway down. You don't need to remove it all. Play around with it and you will get the idea.


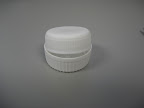
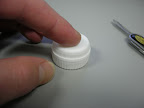
Once you have removed the threads, simply put the smaller cap inside the bigger cap and work them together. If you have done it right you will usually hear/feel a click.


That's it! You have yourself a light, rigid container. As you can see, I used this one for a roll of dental floss in my survival kit.


There are a lot of things that you might consider making one of these for:

  • pillbox or medication
  • cotton balls and vaseline
  • condom for emergency water container
  • backup container of char cloth
  • salt
  • baking soda - just enough for a weekend trip for brushing the teeth!
  • emergency fishing kit - put a couple of hooks, sinkers and line in here. My favorite.
  • spices
  • coffee filters - for emergency water filter (not purifying)
  • water purification tablets
  • string or cordage, or thread for sewing (though the needles will not fit)

Thanks for reading,

October 22, 2007

First spoon...

I think I promised to post pictures of my first spoon carving.


Here it is:

This is exactly where my wife decided to display it.... Should be interesting to see where she puts the other dozen or so I will probably make too!

It was made from a piece of cedar to test out my new Carving Jack. It probably would not be good to use in the woods. Even oiled.... yes?
At some point soon I will be making one for my kit. Need to find the right piece of wood first.


More to come,
Thanks, Decado.
October 17, 2007

You know you are a bushcrafter when...

I was just checking out Sam's Woodcraft in Poland Blog. (yes.... I know.... work! But its break time so its ok.) I read a post that Sam titled the same as this one - You know you are a bushcrafter when... and I had to laugh!

Through the years as I researched 'Ultra-light' techniques and ideas and then on to my period of "Obsessive creator of the ultimate Survival kit" which I taught my Scout troupe, and now moving into the focus of Bushcraft, I am always on the lookout for containers that could be used for an other purpose than its original design.

I have always felt that the only true way to help the environment and compensate for manufacturers over use of our natural resourses was to go through my neighbours recylcle bins on the street (late at nite of course) and nick anything that looked useful. Then there are the uses goods stores like Sally-Ann (salvation army stores), Value Villages, and lets not forget the ever popular "Garage Sales!"

I was collecting plastic caps off of bottles (will post their use later), empty vitamin bottles, juice cans, VHS cases, used camera cases and pouches, food containers, you name it - I collected it!

It got to the point where I have so much stuff around that could be useful for one kit or another that I could probably sit down and make a dozen or two kits and still have stuff left over! (A point my lovely wife has no problem reminding me of)

I think I lost my point somewhere back there but here it is in a nutshell: I am always looking at things in stores, our house, or out on the street that I could modify and make into some new cool piece of camping/bushcraft gear!

Nice to know I am not the only one in the world doing it! Now I am just going to have to come up with some posts about stuff I can make out of other stuff! Thanks Sam!

Thanks for reading!

October 10, 2007

Wood Stove Project

For the last couple of weeks I have been working on making good quality wood stove. I have made pop-can stoves that worked quite well but.... the idea of never having to carry fuel is appealing. During my research I found quite a few references to "Gassifiers" or "Gasification".

At first I thought that the concept was cool! But finally decided to keep this project simple for now. A lot of the inspiration came from the "Ravenlore - Bushcraft and Wilderness skills" website. Gary's Multipurpose Cooking kit was impressive. Simple, compact, versatile and effective.

I have a couple of finishing touches still left to do but I will post pictures of it soon.