"The more you know, the less you carry" - Mors Kochanski.
Showing posts with label Cooking. Show all posts

November 11, 2008

Bushcraft Cooking done easy...

Now that Autumn is in full swing, it is only natural that my thoughts turn to some of the more important aspects of Wilderness Living..... FOOD! Don't laugh! During summer months food tends to be the last thing on my mind. I grab a bunch of dried food stuffs from the last "Dehydrate Everything" Session, shovel it into zip-lock bags and go! No problem.

I guess that once the weather turns colder there is some human instinct that tells us we need to eat in order to make it through the winter. That being the case I like to rummage through my camping cookbooks and get some new or re-newed ideas. Found this recipe the other day and shared it with Mungo when he stopped off at the farm to check things out. It is a simple dish but it sure fills in all the holes when you are hungry and chilled!

Here is the recipe in its simplest form - try it and tell me what you think! You can prepare it at home and put in zip-lock bags to re-heat in water or make it right there at camp.

Cheesy Potato Ham Stew.

  • 2 tbsp - margarine
  • 1 - small onion, fine chopped
  • 1 1/2 tbsp flour
  • 1 cup milk
  • salt and pepper to taste
  • 1 cup diced cooked ham
  • 2 medium potatoes, sliced thin
  • 1/2 cup grated cheese

In a sausepan melt margarine and add onions. Saute onions for about a minute. Add flour as you stir to make a paste. Slowly add milk. Then season to your preference. Put ham and potatoes in casserole dish or Dutch oven and add the sauce. Cook for 15 minutes at a temperature of 400 degrees in oven. Open lid and throw cheese on top. Close lid and cook for about 5 more minutes. Remove from heat and let cool. The rest is up to you!

Let me know if you like it.

Decado

October 27, 2008

Hunters and a cool way to cook lunch...

So my brother and his kids came to stay with us for the weekend and we gave them a grand tour of the property. They said they loved it! Had a great time driving the kids around on the ATVs and exploring. We even found a tree-stand that a hunter had set up on our property. Not impressed but it turned out to be a neighbor that was confused about the property lines. Spoke to him today and he seems real nice. Came to an agreement and things were worked out.

Anyway... onto the main topic of this post which is a neat trick to heat up a pot of water. I found it really neat. So here is how it works:

Get yourself a pot of water (Juice Can), a cotton ball with petroleum jelly, and some lighter fluid.
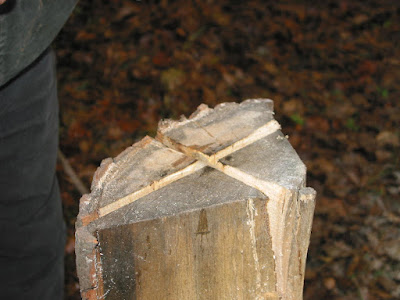
The lighter fluid is optional but it makes getting the fire going much faster. Then you get yourself a good sized log that is dry. Like this:

This was a piece of Poplar from our stock of wood for the furnace.
My advice is that you try to make the wood as big around as you can and as dry. Now you need to cut an 'X' in the top of it. (make sure the wood will stand up on its own)

Here is my brother starting to cut with one of my old bowsaws:

That did not work out well as children under the age of 8 standing out in the rain do not have the greatest of patience. So we had to find a way to cut the notches faster....

This works...


Notches about 4 inches deep, complete:


Now you will need to place the cotton ball in the center of the 'X' and then pour a large amount of lighter fluid (if you have it) and then strike it!


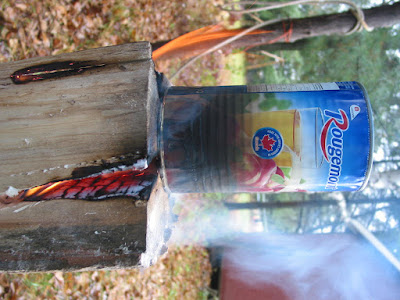
Now just let it burn! Leave it for about five minutes (or whatever you think it needs) to let it burn enough to put a pot on it.

I found that once it really started going, the wind blowing in from the side helped to keep the fire going. All told, it took a little more than 20 minutes to get a pot of water to a full rolling boil. That was not including cutting time. But it did get the water boiling and I did not have to add anything or help the fire in any way!


(opps sorry. forgot to fix this)

(and this...)

(there we go... much better. Neck was getting sore)


Sorry did not measure the amount of water. But if you are thinking you have dozens of way you could heat water faster, remember this! I lit it! And left it!

I am sure there are a few pro and cons to this but I thought it was neat! I always have a swede saw blade in my belt (between 2 layers) with my possibles pouch... but that is a post that shall have to wait.

Thanks for reading me,

Decado.

February 27, 2008

Sort of like bushcraft...

So. Been busy of late, trying to define a new direction in my life. Looking at going back to school for a bit.... re-focusing my career direction so to speak. Getting better connected with my kids. Trying to make my wife's life more available to her to pursue things that have been on the back-burner for her since child-birth. Even went out to do a little bushcraft/winter survival practice in the woods. (it rained of course)


Then last night just before dinner it hit me! I should do something bushcrafty! But what? Then it hit me again! This time I asked it to stop so I could continue my thought.


Turns out with Mungo's post about fish.... I remembered the lake trout I had in the freezer that I caught last summer. Well what is more bushcrafty than cooking up something you caught with your bare hands? (bare hands and a fishing pole that is) But if I was to do this right I would have to do it as bushcrafty as possible!


First I went out into the backyard and started gathering fuel for a fire. Then I realized that I did not have a fire permit and my neighbors would probably be calling the fire department before I even had the fish near the fire. Well.... I could use the BBQ. That is kind of bushcrafty.... right?


Then I went to get my cook set so that I could get this fish a' cooking! Then I realized that all my cookset stuff was either sitting in storage or still out in my car packed and dirty from the trip I did a couple weekends ago! And its such a long walk out to the car in the cold.... hrmmm. Well... I could use tin-foil! That is kind of bushcrafty.... right?


Before I could begin to cook this delicious morsel, it would need garnishes and seasonings! Then I realized that I live in Canada and that there will probably still be snow on the ground until late June! Hence the lack of fresh plant life for harvesting. Well.... I could use some salt and things from my wife's well-stocked spice drawer! That is kind of bushcrafty.... right?


As the fish is cooking away in a somewhat bushcrafty way, and I work on putting together my family's supper (kids are under 6 years and won't touch the fish even if it had batter around it) . I wait in anticipation. I look forward to eating this meal with my hand-carved fork. But I have not had a chance to finish it yet. Oh! What about my hand-carved spoon! Oh wait, I have not treated it yet. It's not done either. Well maybe I could just be all tough and manly and just eat it with my fingers.... he he.... YEAH.... oh wait. If I do that the dog will not leave me or my fingers alone for the whole night. Well I suppose I could use some chop-sticks! They are made of wood, right? That is kind of bushcrafty.... right?


Well, the fish tasted great! I loved it!


*SIGH* When the hell is spring going to be here anyway?

Decado

October 25, 2007

Working on the stove...


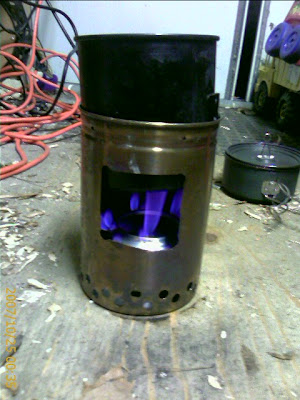
So I have been working on one of my components to my bushcraft kit. The stove. I have based the design on Ravenlore's Mulit-purpose cooking kit. The basis of the stove is that it can be used with multiple types of fuel. The main fuel of course is wood, since it is all around and this type of stove uses a lot less wood than a campfire. In some places where fires are banned, this type can still be used. But I wanted to work and test it out with other fuels as well since each has its own pros and cons. So other than wood, I was working on Meth-Alcohol, solid fuel, and an idea my brother gave me: charcol. (not a lot ... just a couple as a backup situation. 2 or 3 should work but will have to test)

I will have more information for everyone including pictures of the whole kit and such later. Last nights work was on creating a new alcohol stove that I could keep in my cook set. Everyone has probably heard of the pop can stove, (and I have been using them for a couple of years now) but I wanted to try something bigger that worked well when I left the stove at the bottom of the stove pot, instead of mounting it halfway up the can. Simplicity is the name of the game here people!

I tried using beer cans to start, but I found that the amount of space on the inside of the can will drastically change the efficiency of the stove. After playing around with a couple of different cans and hole punching scenarios, I ended up using 2 of those "ginseng drink" cans.

One thing that I think I learned was that the less holes punched for the gas to come out and burn, the harder it is to keep the thing lit. The more holes you punch the hotter it is but the faster you use up the fuel. It's all in finding the balance, my friend.

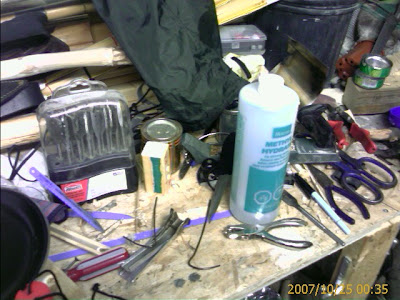
So after playing around in the shed (when I should have been sleeping) I think I got one that works. I will be testing it out down in New Hampshire when I make it down for the training course with Mors Kochanski in a week! *insert embarrassing dance of joy here*


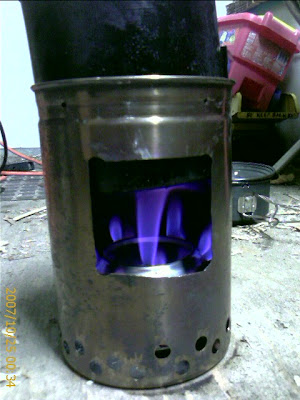
Here is a couple of pictures of the stove with the alcohol stove lit.


Once I have completed the stove/cooking kit I will get some pictures up of it so you can see how it turned out.

Thanks for reading,

October 22, 2007

First spoon...

I think I promised to post pictures of my first spoon carving.


Here it is:

This is exactly where my wife decided to display it.... Should be interesting to see where she puts the other dozen or so I will probably make too!

It was made from a piece of cedar to test out my new Carving Jack. It probably would not be good to use in the woods. Even oiled.... yes?
At some point soon I will be making one for my kit. Need to find the right piece of wood first.


More to come,
Thanks, Decado.

October 10, 2007

Wood Stove Project

For the last couple of weeks I have been working on making good quality wood stove. I have made pop-can stoves that worked quite well but.... the idea of never having to carry fuel is appealing. During my research I found quite a few references to "Gassifiers" or "Gasification".

At first I thought that the concept was cool! But finally decided to keep this project simple for now. A lot of the inspiration came from the "Ravenlore - Bushcraft and Wilderness skills" website. Gary's Multipurpose Cooking kit was impressive. Simple, compact, versatile and effective.

I have a couple of finishing touches still left to do but I will post pictures of it soon.